If you spend much time researching trail cameras, or reading people talk about them online, you'll see the term “trigger speed” thrown around quite a bit. Trail camera companies almost always list trigger speed as one of the relevant specs on their product listings, so it must be important. And no doubt you've probably seen someone complain about a blurry picture and blame the trigger speed. Too often people use trigger and shutter speed interchangeably, and they aren't anywhere close to being the same thing. Let's examine what each one truly is and how they work together to deliver images so the next time you get together with your buddies, you can sound like a trail camera expert.
TRIGGER SPEED
Simply put, trigger speed is how fast a trail camera goes from sleep mode to active mode. Sleep mode is a requirement for trail cameras. Think about your phone. You have to charge your phone every night, if not more. If trail cameras were always on, that set of batteries wouldn't last nearly as long as it does. To help extend battery life, trail cameras use sleep mode to rest the camera between active image-taking periods.
The motion or infrared sensor of the camera acts not only to trigger the camera to take a picture but also to “wake up” the other parts of the camera from sleep mode so they can function fully. The trigger speed is how fast that sensor is triggered when the camera is ready to take a picture.
Trigger speeds vary from model to model, and understanding trigger speed can help you choose the right model for every application of a trail camera. A camera location at a feeding or mineral site, or a scrape, where the animal is more likely to linger, doesn't require the same trigger speed as an escape corridor or active trail. Similarly, placing a slower trigger speed camera on one of those fast-moving trails is likely to result in empty images because the deer tripped the sensor too close to when it moved beyond the camera angle for the slower trigger speed to capture the image.
So, how can we ensure that we are capturing the fewest number of empty images?
- Place the camera at an angle to a trail so the camera has a longer detection angle relative to the picture-taking window
- Use the camera with the fastest trigger speed on areas that require it
- Save slower trigger speed cameras for more stationary area
SHUTTER SPEED
So now that we know what trigger speed really is, what exactly is shutter speed? Shutter speed is the amount of time that the digital sensor (or film, for those of us old enough to remember) is exposed to light to capture the image.
Modern digital cameras, including trail cameras, have advanced so far in the last decade that it's nearly impossible to take a picture that is over-exposed (bright and washed out) or under-exposed (too dark to see the image). The censors that determine exposure for optimal picture quality are remarkable, but understanding how they work can still help you place your cameras in the best position to give you the best images possible.
Generally speaking, the brighter the ambient light, the faster the shutter speed. Because there is adequate light, the censor may only be exposed for milliseconds to prevent overexposure. Photos taken in adequate light are rarely blurry because the short exposure time does not give the subject enough time to move and distort the image being taken.
Which brings us to nighttime photos. We’ve all had it happen. There’s a massive buck on your camera, moving down a well-known trail, but you can’t tell if he’s a 10 or a 12 because the photos are blurred. This is where you’ll often hear people blame trigger speed. If the buck is in the image, the trigger speed did its job, so what’s the problem?
Nighttime photos lack adequate ambient light to match daytime picture quality. Infrared flashes are preferred for trail cameras to avoid spooking game, but they also don’t produce the brilliant lighting effect that traditional flashes create. This results in a setting that is less forgiving to movement during picture taking. The same area that may only need 1/60 of a second of exposure during the day, requires ½ of a second exposure for night photos. Set the stopwatch on your phone and see how far you can move in half a second. That movement is going to show up as a blur on an IR trail camera photo.
Understanding shutter speed, what can we do to reduce blurred images?
- For areas more prone to moving targets, deploy a camera with multiple flash settings and multiple night LED settings for blur reduction, though this will take a toll on batteries.
- Avoid areas where you expect the deer to be moving quickly if you want nighttime photos.
Understanding the relative strengths and weaknesses of your trail camera can help you place the right camera for the right job, and avoid a disappointing haul of photos. Similarly, understanding the terms, and features associated with those terms, can help you make the right decision when you purchase your next trail camera.
Examples
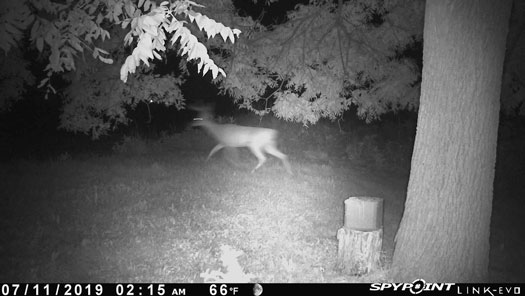
You can tell that this buck is moving along pretty well, and the movement that took place while the censor was exposed for a picture at 2AM shows up as a blur. A short enough exposure to stop this from happening would have resulted in an underexposed image.

In the exact same location at almost the exact same time of day, this image of the buck moving much more slowly is crisp and lacks any noticeable blur.
This is because, for the time the censor was exposed, the target was not moving at the speed it was in the other image.