How Does The FLEX-RANGE work?
The FLEX-RANGE is a trail camera that uses both cellular and satellite network connection when on an active satellite transmission plan. First, it will search for a cellular network. If one cannot be found, it will to connect to satellite. At the next daily sync, the camera will search again for a cellular network. It will connect if one is available or stay in satellite mode if one is not found. Please note, due to carrier limitations some functionalities of the camera change depending on what network it is connected to. Please see below for details.
Learn more about the FLEX-RANGEHow Does The FLEX-RANGE work?
The FLEX-RANGE is a trail camera that uses both cellular and satellite network connection when on an active satellite transmission plan. First, it will search for a cellular network. If one cannot be found, it will to connect to satellite. At the next daily sync, the camera will search again for a cellular network. It will connect if one is available or stay in satellite mode if one is not found. Please note, due to carrier limitations some functionalities of the camera change depending on what network it is connected to. Please see below for details.
Learn more about the FLEX-RANGECellular Mode
- Up to Unlimited Photo Transmissions
- Up to 12 Syncs (or Each Detection) Per Day
- Video Mode
- HD Photo and Video Requests
- Multishot, Time-Lapse and Time-Lapse+ Mode
If the Cellular Signal is lost:
Satellite Mode
- Up to 250 Photo Transmissions
- Up to Six Syncs Per Day
- ❌ Video Mode
- ❌ HD Photo and Video Requests
- ❌ Multishot, Time-Lapse and Time-Lapse+ Mode
Cellular Mode
- Up to Unlimited Photo Transmissions
- Up to 12 Syncs (or Each Detection) Per Day
- Video Mode
- HD Photo and Video Requests
- Multishot, Time-Lapse and Time-Lapse+ Mode
If the Cellular Signal is lost:
Satellite Mode
- Up to 250 Photo Transmissions
- Up to Six Syncs Per Day
- ❌ Video Mode
- ❌ HD Photo and Video Requests
- ❌ Multishot, Time-Lapse and Time-Lapse+ Mode
In The Box
-
FLEX-RANGE
Camera -
Antenna
& Gasket - installation Strap & Carry Bag
-
Two PRE-ACTIVATED CELLULAR SIM cards
+ Satellite Connectivity
(do not remove)
In The Box
-
FLEX-RANGE
Camera -
Antenna
& Gasket - installation Strap & Carry Bag
-
Two PRE-ACTIVATED CELLULAR SIM cards
+ Satellite Connectivity
(do not remove)
In addition to your camera, you will need
-

Power Source
Eight AA non-rechargeable lithium batteries
Browse all power sources
or
LIT-22 rechargeable lithium battery pack
or
SPLB-10 or SPLB-22 Solar Panel -

Memory Card
Ultra-high speed microSD card
Purchase a 32GB microSD card
2 to 512 GB • Class 10 -

The SPYPOINT APP on mobile or web
Log in with your account
or
Create an accountAvailable on the latest versions of iOS and Android


-

Satellite Plan
A satellite plan is required to use satellite mode
Each satellite plan includes 250 photos while connected to satellite and unlimited cellular photo transmissions.
Purchase Satellite plan -

PDF
Download a copy of this Quick Start Guide and/or the FLEX-RANGE manual so you can view them in the satellite-only zone.
Download the Quick Start Guide
Download the FLEX-RANGE manual
In addition to your camera, you will need
-
Power Source
Eight AA non-rechargeable lithium batteries
Browse all power sources
or
LIT-22 rechargeable lithium battery pack
or
SPLB-10 or SPLB-22 Solar Panel -
Memory Card
Ultra-high speed microSD card
Purchase a 32GB microSD card
2 to 512 GB • Class 10 -
The SPYPOINT APP on mobile or web
Log in with your account
or
Create an accountAvailable on the latest versions of iOS and Android
-
Satellite Plan
A satellite plan is required to use satellite mode
Each satellite plan includes 250 photos while connected to satellite and unlimited cellular photo transmissions.
Purchase Satellite plan -
PDF
Download a copy of this Quick Start Guide and/or the FLEX-RANGE manual so you can view them in the satellite-only zone.
Download the Quick Start Guide
Download the FLEX-RANGE manual
Required before using Satellite mode
Required before using Satellite mode
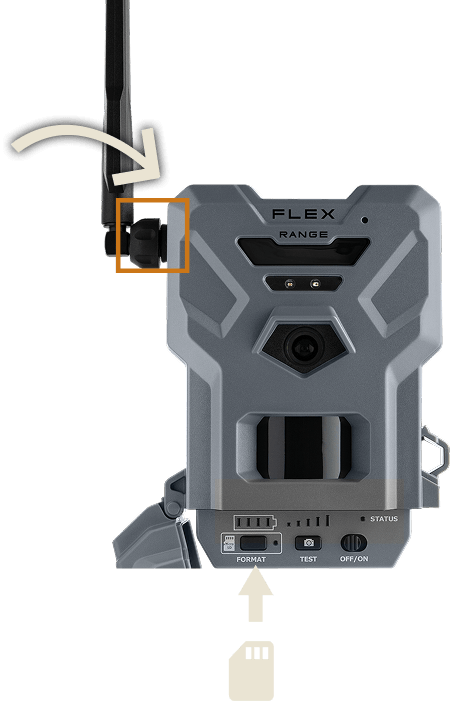
Step 1 REMOVE THE RED COVER, Screw on the antenna and Insert a microSD Memory card
The pins on the microSD card should be face up when inserted.
Purchase a 32GB microSD card
Step 1 REMOVE THE RED COVER, Screw on the antenna and Insert a microSD Memory card
The pins on the microSD card should be face up when inserted.
Purchase a 32GB microSD card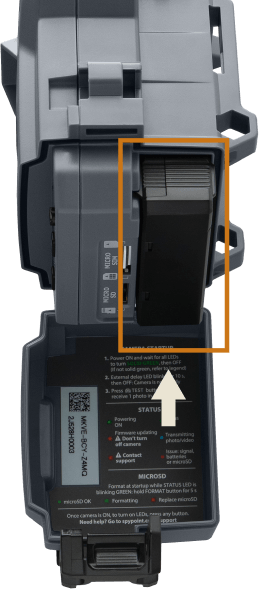
Step 2 Insert batteries
Use brand new, non-rechargeable AA batteries or a fully-charged LIT-22 battery pack.
View all power source options
Step 2 Insert batteries
Use brand new, non-rechargeable AA batteries or a fully-charged LIT-22 battery pack.
View all power source options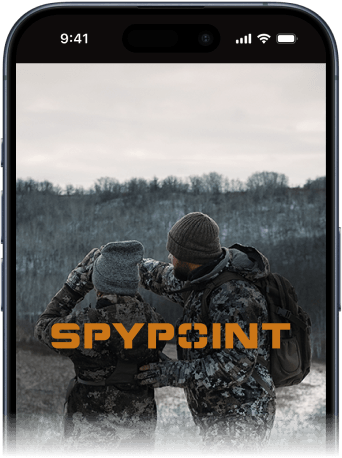
Step3 Login to the SPYPOINT APP
Login to the mobile app or create an account on the web app now.
Step3 Login to the SPYPOINT APP
Login to the mobile app or create an account on the web app now.
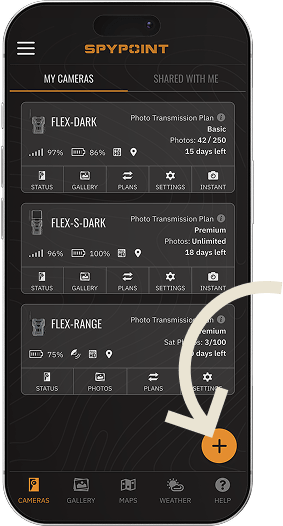
Step4 Add your FLEX-RANGE camera
Select the cameras tab, then press the + button on the bottom right of the screen.
Step4 Add your FLEX-RANGE camera
Select the cameras tab, then press the + button on the bottom right of the screen.
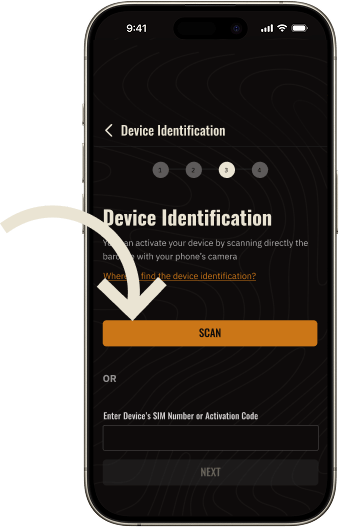
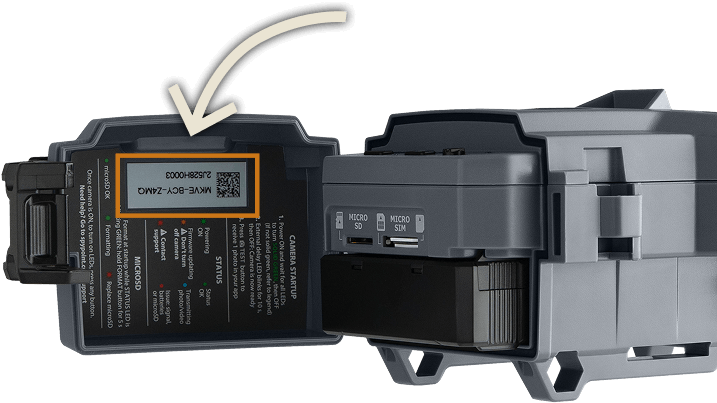
Step5 Activate the Camera
Follow the instructions to scan the QR code and activate the camera.
Step5 Activate the Camera
Follow the instructions to scan the QR code and activate the camera.
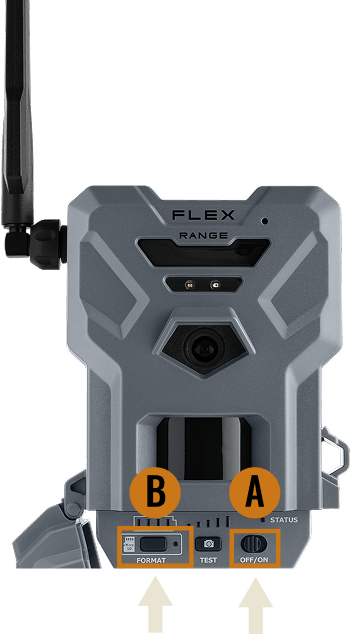
Step 6 Turn the camera on (A) and format the microsd card
Immediately hold the FORMAT button (B) for five seconds. The FORMAT LED light will blink green until the microSD card has finished formatting.
Step 6 Turn the camera on (A) and format the microsd card
Immediately hold the FORMAT button (B) for five seconds. The FORMAT LED light will blink green until the microSD card has finished formatting.
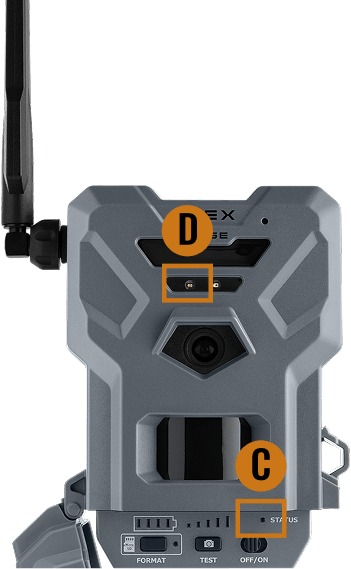
The first start-up sequence will initiate a remote download of the latest firmware. The STATUS light (C) may flash orange in that case. Please note, this process can take up to 15 minutes to complete.
Once the STATUS light (C) stops flashing, it will stay steady, and the DELAY light (D) will flash 5 times. Then your camera is ready.
The first start-up sequence will initiate a remote download of the latest firmware. The STATUS light (C) may flash orange in that case. Please note, this process can take up to 15 minutes to complete.
Once the STATUS light (C) stops flashing, it will stay steady, and the DELAY light (D) will flash 5 times. Then your camera is ready.
Step7 Make sure your camera syncs
If your camera hasn't synced within 30 minutes,
follow these support steps or contact us.
Step7 Make sure your camera syncs
If your camera hasn't synced within 30 minutes,
follow these support steps or contact us.
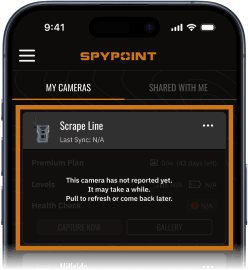
A Wait for your camera to report. This may take up to 30 minutes.
A Wait for your camera to report. This may take up to 30 minutes.
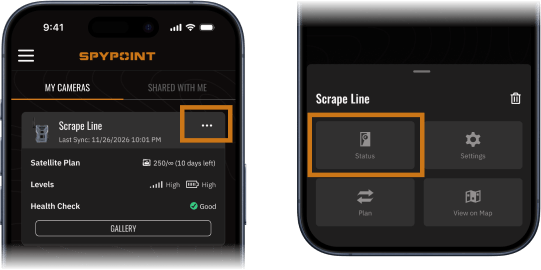
B Once reported, check on the camera’s status.
B Once reported, check on the camera’s status.
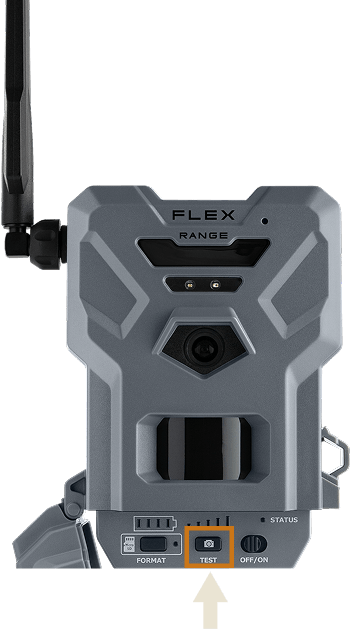
Step 8 Take a test photo
Motion in front of your camera or use the TEST button to send a photo to the SPYPOINT app. The “STATUS” light will turn blue to confirm your camera is transmitting the photo using cellular service. Once sent, you will be able to see the photo in your gallery.
Step 8 Take a test photo
Motion in front of your camera or use the TEST button to send a photo to the SPYPOINT app. The “STATUS” light will turn blue to confirm your camera is transmitting the photo using cellular service. Once sent, you will be able to see the photo in your gallery.
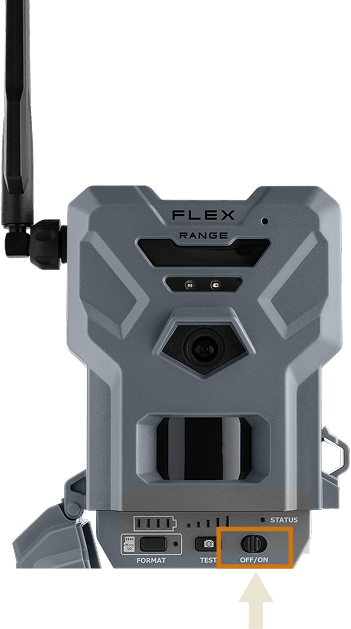
Step 9 Switch off youR camera
Keep your camera off until you are ready to finalize your setup in the satellite area.
You now have a seven-day cellular trial period. You must purchase a Satellite plan to use satellite mode.
Purchase the Satellite plan
Step 9 Switch off youR camera
Keep your camera off until you are ready to finalize your setup in the satellite area.
You now have a seven-day cellular trial period. You must purchase a Satellite plan to use satellite mode.
Purchase the Satellite planDon't forget!
before going into the field, you will need:
-
An active SATELLITE PLAN
You must purchase a Satellite plan before going into the field to use satellite mode during installation.
The Satellite plan also includes unlimited cellular photo transmissions, allowing the camera to use cellular connectivity whenever it's available and satellite connectivity when it's not.
Purchase the Satellite plan -

An optional microSD Card reader
(NOT INCLUDED)If you wish to view a test photo from your camera in the satellite area (for example, to verify camera position) you will need a microSD card reader or adapter (NOT INCLUDED) to view the images directly from the microSD card. You will not be able to access the SPYPOINT app without access to Wi-Fi or a cellular network.
Don't forget!
before going into the field, you will need:
-
An active SATELLITE PLAN
You must purchase a Satellite plan before going into the field to use satellite mode during installation.
The Satellite plan also includes unlimited cellular photo transmissions, allowing the camera to use cellular connectivity whenever it's available and satellite connectivity when it's not.
Purchase the Satellite plan -
An optional microSD Card reader
(NOT INCLUDED)If you wish to view a test photo from your camera in the satellite area (for example, to verify camera position) you will need a microSD card reader or adapter (NOT INCLUDED) to view the images directly from the microSD card. You will not be able to access the SPYPOINT app without access to Wi-Fi or a cellular network.
Download A copy of the Quick start guide
For AREAS Without cell service
please note: links will only work in areas with cellular or wi-fi service
Download A copy of the Quick start guide
For AREAS Without cell service
please note: links will only work in areas with cellular or wi-fi service
Recommendations
Recommendations
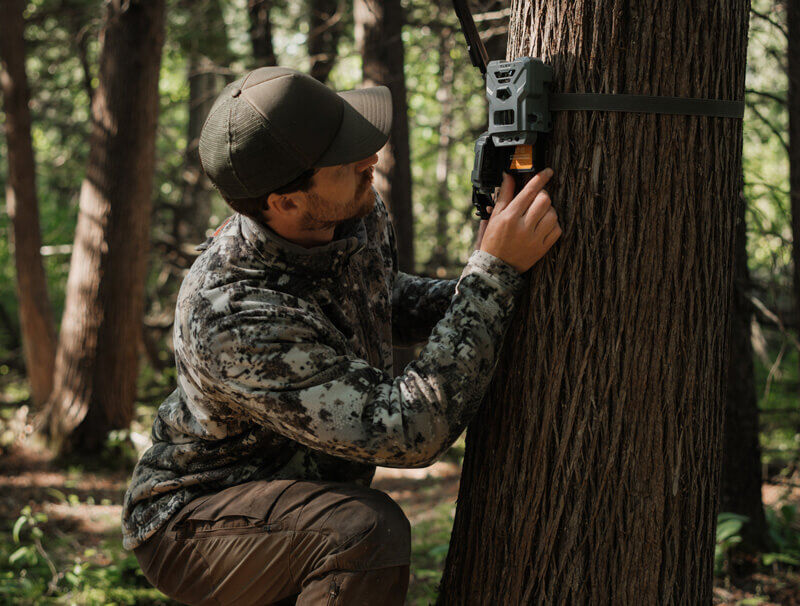
Install Your Camera
- Use: Installation strap
- Orientation: North or South
- Height: Subject’s mid-body
- Distance: Subject should be at 25 ft (7.5 m) away from the camera.
- Lens sight: No leaves, branches or tall grass in front that could trigger the camera
Note: To optimize satellite signal, place in an unobstructed area with a clear view of the sky.
Install Your Camera
- Use: Installation strap
- Orientation: North or South
- Height: Subject’s mid-body
- Distance: Subject should be at 25 ft (7.5 m) away from the camera.
- Lens sight: No leaves, branches or tall grass in front that could trigger the camera
Note: To optimize satellite signal, place in an unobstructed area with a clear view of the sky.
Step 1 Turn On Your Camera
Power the camera on to verify communication and signal.
Step 1 Turn On Your Camera
Power the camera on to verify communication and signal.
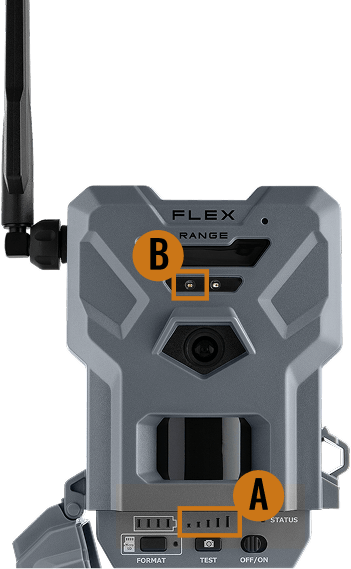
Step 2 Wait for your camera to connect
Signal lights (A) will flash green until your camera is connected to a cellular network or satellite.
You will then see the delay light (B) flash green five times. When all the lights turn off, your camera is ready and awaiting a trigger.
Step 2 Wait for your camera to connect
Signal lights (A) will flash green until your camera is connected to a cellular network or satellite.
You will then see the delay light (B) flash green five times. When all the lights turn off, your camera is ready and awaiting a trigger.
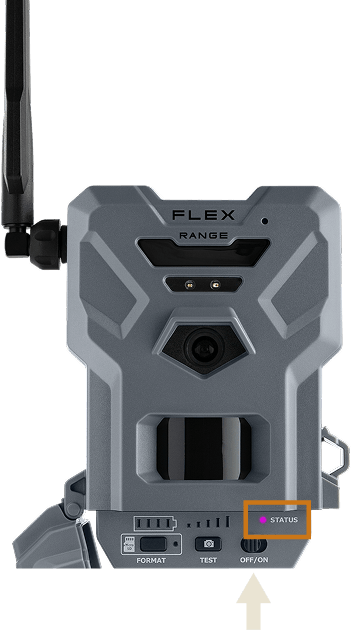
Step3 Take an optional test photo
If you want to verify camera placement or test whether your camera is taking photos, you can walk in front of your camera to trigger a photo capture.
When transmitting, the “STATUS” light will turn blue (cellular transmission) or purple (satellite transmission).
To view the photo, switch off your camera and withdraw the microSD card. Then, use a microSD card adapter or reader (NOT INCLUDED) to view the files on your phone, tablet or laptop in the folder “DCIM” then “100DSCIM”.
Step3 Take an optional test photo
If you want to verify camera placement or test whether your camera is taking photos, you can walk in front of your camera to trigger a photo capture.
When transmitting, the “STATUS” light will turn blue (cellular transmission) or purple (satellite transmission).
To view the photo, switch off your camera and withdraw the microSD card. Then, use a microSD card adapter or reader (NOT INCLUDED) to view the files on your phone, tablet or laptop in the folder “DCIM” then “100DSCIM”.
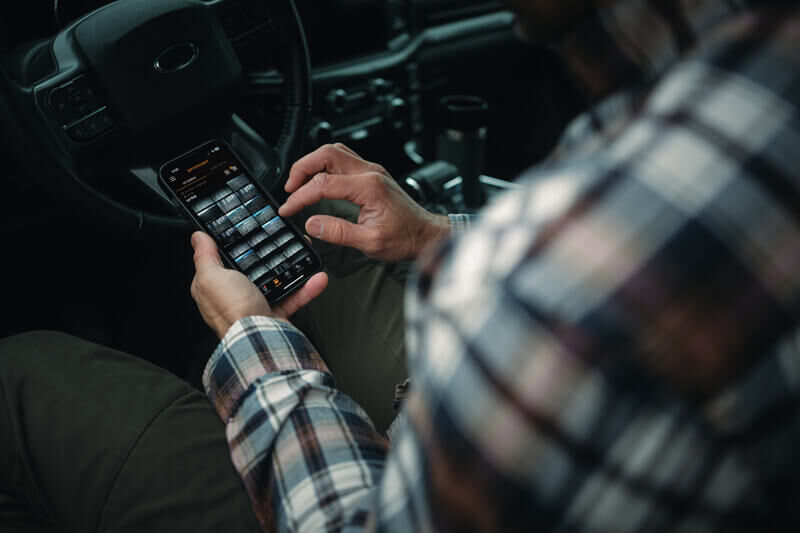
Step4 return to aN AREA WITH A cellular NETWORK OR WI-FI CONNECTIVITY
Once you are back in a cellular network or Wi-Fi area, you can check the SPYPOINT app to verify the status of your camera and update your settings. If you took a test photo, you can check to see if it appears in your gallery. Please note, depending on sync frequency, this may take up to 24 hours.
Understand your camera settings
Step4 return to aN AREA WITH A cellular NETWORK OR WI-FI CONNECTIVITY
Once you are back in a cellular network or Wi-Fi area, you can check the SPYPOINT app to verify the status of your camera and update your settings. If you took a test photo, you can check to see if it appears in your gallery. Please note, depending on sync frequency, this may take up to 24 hours.
Understand your camera settingsYou are now ready to use your camera.
You are now ready to use your camera.


